Good evening, I'm Milpirika.
In this article, I will introduce additional Evolutions (Equipment) in the Maneater Truth Quest.
Some parts of the description that are difficult to understand or misleading seem to be the same as ever, even with the DLC. Therefore, I would like to enhance, detail and explain the equipment again this time.
List of additional evolution (equipment)
Effects are described with maximum enhancement (Tier 5).
Teeth Evolution
Atomic Teeth

Effect:
- Each successful bite counts for 5.
- Atomic Stack Count
(+1% Damage Resistance, +1% Damage Bonus per count)
(Maximum Count is 30, and the count disappears by 1 every 2 seconds)
(Shared with other Atomic Stack Counts)
Enhanced Table.
| Enhancements | Tier | ||||
| 1 | 2 | 3 | 4 | 5 | |
| ・Atomic Stack Count | 1 | 2 | 3 | 4 | 5 |
| Nutritional Materials Required | |||||
| Protein | - | 18000 | 21000 | 24000 | 28000 |
| Mutagen | - | 600 | 700 | 750 | 800 |
Description.
This equipment is specially designed to accumulate Atomic Stack Counts.
The power increases up to 30%, so the damage is roughly 80 to 95.
However, the Atomic Stack Counts decrease quickly, so you must always be aware of the bite.
Since the basic strategy is to "attack and then leave," this equipment makes it easy to accumulate counts, but difficult to maintain them.
Conversely, it is good to use this equipment with "Atomic Fins," which is hard to accumulate counts but easy to maintain.
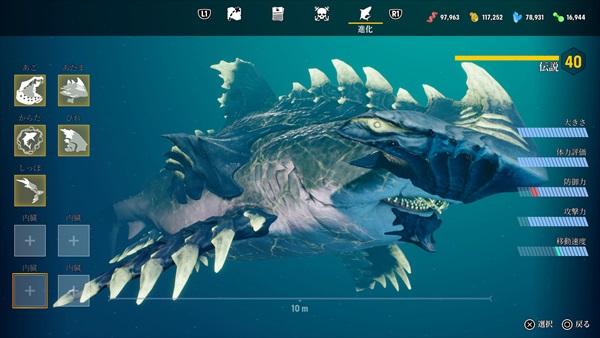
Head Evolution
Atomic Head

Effect:
- 75 damage to everything within 6m when Ramming.
- 5 counted for each successful Ramming.
- Atomic Stack Count
(+1% Damage Resistance, +1% Damage Bonus per count)
(Maximum Count is 30, and the count disappears by 1 every 2 seconds)
(Shared with other Atomic Stack Counts)
Enhanced Table.
| Enhancements | Tier | ||||
| 1 | 2 | 3 | 4 | 5 | |
| ・Explosion Range when Ramming | 3m | 4m | 5m | 6m | ---(6m) |
| ・Explosion Damage during Ramming | 50 | 60 | 65 | 70 | 75 |
| ・Atomic Stack Count | 1 | 2 | 3 | 4 | 5 |
| Nutritional Materials Required | |||||
| Fat | - | 18000 | 21000 | 24000 | 28000 |
| Mutagen | - | 600 | 700 | 750 | 800 |
Description.
Since it is a Ramming performance, it is effective almost exclusively against boats, but since it explodes with Ramming, it can damage all enemies on boats in the explosion range.
It is especially strong if you fight mainly by water evasion, since it also explodes if you hit a boat by water evasion.
However, the performance of Head is good, but Atomic Stack Counts is difficult to use,
For Atomic Stack Counts purposes, it is better to share with other Atomic Evolution.
Incidentally, the game description says something about blowing them up with Ramming, but in reality, you have to Ramming directly into a person or creature to blow them up.
It has no effect on boats at all, and it seems that the explosion does not blow everything up.
Tiger Body
![]()
Effect:
- Amount of all nutrients that can be obtained+25%
Enhanced Table.
| Enhancements | Tier | ||||
| 1 | 2 | 3 | 4 | 5 | |
| ・Total Nutritional Gain | 5% | 10% | 15% | 20% | 25% |
| Nutritional Materials Required | |||||
| Fat | - | - | 10000 | 12000 | - |
| Minerals | 8000 | - | - | 14000 | |
| Mutagen | - | - | - | 175 | 350 |
Description.
It can be obtained by purchasing the first limited edition of Maneater or the DLC "Truth Quest" and can be equipped by going to the first grotto.
When equipped with this body, instead of not being able to go into evolution mode,
all the nutrition you can get will be 1.25 times more.
Also, treasure chests and storyline rewards are also 1.25 times more rewarding, so if you have the Tiger Body enhanced and equipped, you can enhance other equipment much faster.
Furthermore, Evolution is added in the DLC as well, and the nutrition required to strengthen it is quite a lot, making it a very powerful effect.
(I personally like the way it looks, it's flashy too.)
By the way, when I was playing the game, I did not use the body evolution mode, but used the Tiger Body for the time being to earn nutrition, so if you are worried about equipment, I recommend the Tiger Body.
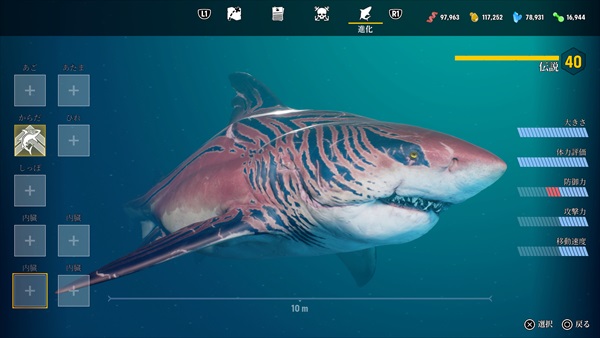
Atomic Body

Effect:
- When it evolves, it goes into Atomic Blast mode.
Atomic Blast
- It can be activated by pressing the evolution button when the gauge has been built up, and gains the following abilities:
・Pressing and holding the "Bite" button charges the beam, and while charging the beam, it enters a slow-motion state.
・When the button is released, the beam is fired, and the longer the charge time, the more damage it does.
・The basic damage of the beam is 200, and the blast deals 100 basic damage within 10 meters.
Enhanced Table.
| Enhancements | Tier | ||||
| 1 | 2 | 3 | 4 | 5 | |
| ・Basic Damage of the Beam Itself | 100 | 125 | 150 | 175 | 200 |
| ・Basic Damage from Beam Explosion | 50 | 63 | 75 | 83 | 100 |
| Nutritional Materials Required | |||||
| Fat | - | 18000 | 21000 | 24000 | 28000 |
| Mutagen | - | 600 | 700 | 750 | 800 |
Description.
It is the main and most powerful equipment in the DLC.
As far as you see the shark on the loading screen, you would think that the shark is like a one-hit-kill shark with a powerful laser, but in reality it is more like a shark firing a series of cannon beams to overwhelm the enemy.
The in-game description says that it becomes even stronger with charging time, but there are only two stages of charging, and the second stage takes much longer, so the final damage to the enemy is more if the beam is fired in the first stage.
Therefore, it is recommended to repeat the following steps in Atomic Blast mode.
- Hold down the Bite button to ready the weapon and charge it.
- Charge for about 1 second and fire the beam at the enemy
- At the moment the beam is fired, press the Evade button.
- At the moment of evasion, press and hold the Bite button again.
- Charge for about 1 second and fire the beam toward the enemy.
By repeating the above steps, you will be able to shoot the beam more than 10 times, and if you evade over water, the total damage to the enemy is very high because of the ramming judgment.
Also, because the beam is a long-range attack, this Atomic Blast mode makes it easy to destroy the reinforced creatures that would have taken you a long time to destroy.
Especially in the war against humans,
Helicopters and battleships that have been so hard to destroy will be shattered, and by the time the mode is over, they will be decimated, turning the sea into a horrific scene full of metal wreckage and human corpses.
That's no wonder the enemy would launch a series of torpedoes and other weapons if there were sharks this strong, and I feel pity for them even though they are the enemy.
If you eat up all these human corpses, your gauge will be maxed out and you can do the following loop indefinitely.
(It is also quite efficient as a nutritional gain.)
Activate → Destroy enemies → Prey on corpses → Max gauge → Activate → ...
Once you have tasted this loop, you will be addicted to it. Let's go to the limit of destruction with sharks.
General comments,
This is a performance that is strong against all living things, and moreover, the other evolutionary modes are difficult to use, so it seems that this is all that is needed anymore.
Conversely, if you don't utilize this equipment, the last boss battle will be quite tough, I recommend that you get used to this equipment.
Fins Evolution
Atomic Fins

Effect:
- Damage while Evading +150
- Damage Resistance +50% and Evasion Speed +30% while Evading.
- For each evasion, the Atomic Stack is counted by 3.
- Atomic Stack Count
(+1% Damage Resistance, +1% Damage Bonus per count)
(Maximum Count is 30, and the count disappears by 1 every 2 seconds)
(Shared with other Atomic Stack Counts)
Enhanced Table.
| Enhancements | Tier | ||||
| 1 | 2 | 3 | 4 | 5 | |
| ・Damage while Evading | 100 | 115 | 130 | 140 | 150 |
| ・Atomic Stack Count | 1 | 1 | 2 | 2 | 3 |
| Nutritional Materials Required | |||||
| Minerals | - | 18000 | 21000 | 24000 | 28000 |
| Mutagen | - | 600 | 700 | 750 | 800 |
Description.
This evolution performs well because of its high damage and evasion speed.
However, it is a little peculiar in its movement and has a long evasion distance, making it difficult to hit the enemy directly, so it seems that the other Fins, "Bone Fins," are inevitably easier to use.
Also, since the atomic count only accumulates 3, it is difficult to reach the maximum of 30.
If equipped with Atomic Teeth, the count will accumulate just by evading, which is easy to maintain and is a recommended combination.
Tail Evolution
Atomic Tail

Effect:
- During Tailwhip, it flies an energy projectile that can reach up to 30 meters.
- Energy projectile have a range of 30 m and a damage of 150
Enhanced Table.
| Enhancements | Tier | ||||
| 1 | 2 | 3 | 4 | 5 | |
| ・Damage from Energy Projectiles | 100 | 115 | 130 | 140 | 150 |
| Nutritional Materials Required | |||||
| Minerals | - | 18000 | 21000 | 24000 | 28000 |
| Mutagen | - | 600 | 700 | 750 | 800 |
Description.
It is the most damaging equipment among Tailwhip's long-range attacks and has the same range, so it is simply easy to use and recommended.
It already has 100 damage at Tier 1, which is higher than Bite's 80 damage.
In other words, it is more powerful and safer to fly the energy projectile with the tail than to approach the enemy and bite him.
Organs Evolution
Tail Thrower

Effect:
- Whipshot Damage+25%
- Whipshot Speed +200%
- Whipshot Range+200%
- Pushing force during Tailwhip +200%
Enhanced Table.
| Enhancements | Tier | ||||
| 1 | 2 | 3 | 4 | 5 | |
| ・Whipshot Damage | +5% | +10% | +15% | +20% | +25% |
| ・Whipshot Speed | +100% | +150% | +200% | +250% | +300% |
| ・Whipshot Range | +100% | +150% | +200% | +250% | +300% |
| ・Pushing force during Tailwhip | +100% | +150% | +200% | +250% | +300% |
| Nutritional Materials Required | |||||
| Protein | - | 16000 | 18000 | 20000 | 22000 |
| Mutagen | - | 500 | 550 | 600 | 650 |
Description.
With this equipment, the Whipshot becomes much easier to use.
It says "range," but it does not extend the range as "flying distance," but rather the range in which you can "search for enemies" becomes wider. I misunderstood.
However, the greatest advantage of this equipment is its "search range.
When an enemy is seen on the screen, the more it flies in that direction, the wider its range expands, making it essential if it is to be used as the main equipment for long-range attacks.
Recovery Factor

Effect:
- Physical strength is restored 36 times per second.
Enhanced Table.
| Enhancements | Tier | ||||
| 1 | 2 | 3 | 4 | 5 | |
| ・Recovery Per Second | +12 | +18 | +24 | +30 | +36 |
| Nutritional Materials Required | |||||
| Minerals | - | 16000 | 18000 | 20000 | 22000 |
| Mutagen | - | 500 | 550 | 600 | 650 |
Description.
It dramatically increases durability.
Basically, if you get this equipment, you should equip it first and strengthen it.
While enemy firepower has increased dramatically with this DLC, the means of recovery have not increased much.
If you equip this evolution, it will recover on its own, and since it is a valuable recovery ability to begin with, it is equipment that you should definitely include no matter which equipment you combine.
However, it is difficult to feel the recovery until you reach Tier 5, so strengthen it as soon as you get it.
Sonic Burst

Effect:
- Produces a shockwave at 30m range during sonar.
- It deals up to 150 damage to organisms and boats, with lower damage the further away they are.
Enhanced Table.
| Enhancements | Tier | ||||
| 1 | 2 | 3 | 4 | 5 | |
| ・Sonar Shockwave Range | 10m | 15m | 20m | 25m | 30m |
| ・Shockwave Damage (Maximum value) | 100 | 115 | 130 | 140 | 150 |
| Nutritional Materials Required | |||||
| Fat | - | 16000 | 18000 | 20000 | 22000 |
| Mutagen | - | 500 | 550 | 600 | 650 |
Description.
It is not a very useful piece of equipment.
For a shockwave, the enemy doesn't blow up or flinch, the damage range is narrow, and the damage is low if you move away from it, It's performance is so good that I think they may have made a mistake in adjusting it.
I can't recommend it because there are other internal evolutions that I would like to include.
Disorienting Sonar

Effect:
- Creatures within 60m range when you activate sonar are weakened for 10 seconds.
- You take -30% damage from creatures in a weakened state.
Enhanced Table.
| Enhancements | Tier | ||||
| 1 | 2 | 3 | 4 | 5 | |
| ・Range that can be weakened during Sonar | 20m | 30m | 40m | 50m | 60m |
| ・Time to be weakened | 6s | 7s | 8s | 9s | 10s |
| ・Damage received from weakened enemies | -15% | -19% | -23% | -27% | -30% |
| Nutritional Materials Required | |||||
| Protein | - | 16000 | 18000 | 20000 | 22000 |
| Mutagen | - | 500 | 550 | 600 | 650 |
Description.
In the case of this equipment, it is a version that reduces the damage taken and can be debuffed with a damage reduction debuff, which increases its durability.
With this and the "Recovery Factor," I don't think any creature will die.
However, as I said, this equipment is also only against living creatures, so it is completely ineffective against vehicles such as battleships and helicopters.
If you have been hit by two torpedoes, leave plainly.
Target Sonar

Effect:
- Creatures within 60m range when you activate sonar are weakened for 10 seconds.
- You deal +30% more damage to creatures in a weakened state.
Enhanced Table.
| Enhancements | Tier | ||||
| 1 | 2 | 3 | 4 | 5 | |
| ・Range that can be weakened during Sonar | 20m | 30m | 40m | 50m | 60m |
| ・Time to be weakened | 6s | 7s | 8s | 9s | 10s |
| ・Damage done to weakened enemies | +15% | +19% | +23% | +26% | +30% |
| Nutritional Materials Required | |||||
| Protein | - | 16000 | 18000 | 20000 | 22000 |
| Mutagen | - | 500 | 550 | 600 | 650 |
Description.
In this case, it is a version that increases the damage given and is very powerful because it can buff the firepower 1.3 times.
The range is also quite wide at 60m, and it can be used for long-range attacks, so you can see how strong it is if you think of it as something that always increases damage by 1.3x.
However, it is not universal, and since this buff is against living organisms, it has no effect at all on battleships, helicopters, etc.
It is a bit of a shame because if it were effective against vehicles, we would have been able to destroy them further by shooting the beam with this evolution and Atomic Body many times to beat them up.
Recommended Equipment
Here are some of the configurations I often equip myself with, for your reference.
Equipped to clear the DLC story
| Evolutionary Part | Evolutionary Equipment |
| Teeth | ・Bio-Electric Teeth |
| Head | ・Bone Head |
| Body | ・Shadow Body |
| Fins | ・Bone Fins |
| Tail | ・Shadow Tail |
| Organ 1 | ・Advanced Sonar |
| Organ 2 | ・Brutal Muscles |
| Organ 3 | ・Reinforced Cartilage |
| Organ 4 | ・------ |
This is the recommended configuration if you have finished the story or collected all the collections.
Against creatures, Bite + chase with long-range attack + poison,
Against humans, use long-range attacks to attack with poison,
Against boats, use Ramming,
The damage resistance is also increased, and the speed is made faster and more comfortable,
This set of equipment is all you need.
I think this equipment is good for people who are going to do the DLC or until new equipment is available.
Equipped for nutritional gain
| Evolutionary Part | Evolutionary Equipment |
| Teeth | ・Free Choice |
| Head | ・Free Choice |
| Body | ・Tiger Body |
| Fins | ・Free Choice |
| Tail | ・Free Choice |
| Organ 1 | ・Protein Digestion |
| Organ 2 | ・Mineral Digestion |
| Organ 3 | ・Fat Digestion |
| Organ 4 | ・-----(Advanced Sonar) |
By equipping Tiger Body and Digestion system internal evolution, You will get 1.25 times more Mutagen and 1.55 times more other nutrition.
You will get more of all nutrients from treasure chests, collections, and story rewards.
If you have taken most of the rewards and that is still not enough, you can earn a lot by preying on humans.
Since the internal Organs cannot compensate for mobility and durability, it would be better to equip the body with Bones, Shadows, etc., except for the Body.
Atomic Evolution Set
| Evolutionary Part | Evolutionary Equipment |
| Teeth | ・Atomic Teeth |
| Head | ・Atomic Head |
| Body | ・Atomic Body |
| Fins | ・Atomic Fins |
| Tail | ・Atomic Tail |
| Organ 1 | ・Advanced Sonar |
| Organ 2 | ・Brutal Muscles |
| Organ 3 | ・Disorienting Sonar |
| Organ 4 | ・Target Sonar |
It consists of a lot of additional DLC equipment.
Atomic equipment is excellent, so you can do a lot with one set without any problems.
It is not without its weaknesses; it is weak against humans and vehicles, and is susceptible to damage.
There are set bonuses, but they are not weak unless you have all of them, so you can replace the missing parts.
Conversely, it can be said that each piece of equipment is evidence of excellence.
The Completed Apex Shark
| Evolutionary Part | Evolutionary Equipment |
| Teeth | ・Bone Teeth |
| Head | ・Bone Head |
| Body | ・Atomic Body |
| Fins | ・Bone Fins |
| Tail | ・Bone Tail |
| Organ 1 | ・Advanced Sonar |
| Organ 2 | ・Brutal Muscles |
| Organ 3 | ・Reinforced Cartilage |
| Organ 4 | ・Recovery Factor |
This configuration can be used in the DLC's rathouse battle, post-clearance, etc.
Anyway, it is very durable and the "Recovery Factor" makes it even harder to die.
The weaknesses of the Bone Evolution Set so far have been as follows:
- No long-range attacks
- Weakness in underwater battle
- The evolution mode of the body is difficult to use.
However, the "Atomic Body" can compensate for all of them, making it unusually easy to use.
It no longer has any weaknesses.
The Home Run Player
| Evolutionary Part | Evolutionary Equipment |
| Teeth | ・Free Choice |
| Head | ・Free Choice |
| Body | ・Free Choice |
| Fins | ・Free Choice |
| Tail | ・Shadow Tail |
| Organ 1 | ・Advanced Sonar |
| Organ 2 | ・(Brutal Muscles) |
| Organ 3 | ・Tail Thrower |
| Organ 4 | ・Free Choice |
It is a semi-playful configuration.
Tailwhips, which can fire energy projectiles, have a fixed range of 30 meters, but the story is different in the case of Whipshot, which bites an object and sends it flying.
In fact, the mechanism is such that if you increase the "Whipshot Speed", the faster you can bite things and send them flying, the greater the flying distance you can achieve.
(Incidentally, it does not seem to have anything to do with the blowing power of the Tailwhip.)
What exactly I mean is,
Normally when you fly an object 45° into the sky it blows up to 100m, but when you equip it with specialized Whipshot Speed like this configuration, it will fly up to about 400m.
It is very surreal to see flying humans and other sharks falling after hitting distant buildings.
If there is a processing failure in the game, the sharks and humans you hit away will literally turn into stars and disappear.
If you get frustrated when you are provoked by a blue shark or other shark around the time you are getting used to the game, you can try to blow it up in the air with Whipshot.
The reason for describing it as semi-playful is that it is free because it requires only about half the equipment needed, and it is also practical because the blowing power of the Tailwhip allows the Tailwhip to separate the distance when the enemy is too close.
Finally.
How was it?
I hope this page has been helpful.
This additional equipment has changed the degree of freedom so much,
Please enjoy a good shark life with various combinations.
See you soon!